このところRaspberry Piで遊んでみて思うことは、
「Raspberry Piはデジタルとモノとネットを融合させる、Makersのための、クリエイティブで楽しい魔法の弾丸だ!」
……ではなくて、
「一時代終わってしまったUNIX爺ィがまったりとUNIXがらみで楽しめるオモチャ」
……のような気がそこはかとなくする、ということであるが、多分、そんなことを書くと、ボロカスにいじめられてしまうのだろうなあ。
人生、無常である。「無常」と「無情」は、音は同じだが漢字は違うんですぜ、ダンナw。
オッサンは生きている。
このところRaspberry Piで遊んでみて思うことは、
「Raspberry Piはデジタルとモノとネットを融合させる、Makersのための、クリエイティブで楽しい魔法の弾丸だ!」
……ではなくて、
「一時代終わってしまったUNIX爺ィがまったりとUNIXがらみで楽しめるオモチャ」
……のような気がそこはかとなくする、ということであるが、多分、そんなことを書くと、ボロカスにいじめられてしまうのだろうなあ。
人生、無常である。「無常」と「無情」は、音は同じだが漢字は違うんですぜ、ダンナw。
Raspberry PiにAD変換ICをつないで遊んでいたわけであるが、ふと「3.3Vを12ビットでAD変換すると、結局1ティック何Vかいな」なぞと計算したくもなる。
たまたまUNIXのコマンドラインにいたら、普通、
# echo 'scale=20;3.3/4096' | bc
……とかやると思うんだけど、ところが、Ruspberry Piには、「bc」がデフォルトでは入ってないのである。
うーむ。bc入れとかなアカンがな、アンタ。世の中のUNIX爺ィがみんな怒りまっせ。
と、いうわけで、
toshio@satoraspi:/var/www$ sudo apt-get install bc
パッケージリストを読み込んでいます... 完了
依存関係ツリーを作成しています
状態情報を読み取っています... 完了
以下のパッケージが新たにインストールされます:
  bc
アップグレード: 0 個、新規インストール: 1 個、削除: 0 個、保留: 0 個。
106 kB のアーカイブを取得する必要があります。
この操作後に追加で 257 kB のディスク容量が消費されます。
取得:1 http://mirrordirector.raspbian.org/raspbian/ wheezy/main bc armhf 1.06.95-2 [106 kB]
106 kB を 1秒 で取得しました (78.0 kB/s)
以前に未選択のパッケージ bc を選択しています。
(データベースを読み込んでいます ... 現在 79298 個のファイルとディレクトリがインストールされています。)
(.../bc_1.06.95-2_armhf.deb から) bc を展開しています...
menu のトリガを処理しています ...
install-info のトリガを処理しています ...
man-db のトリガを処理しています ...
bc (1.06.95-2) を設定しています ...
menu のトリガを処理しています ...
toshio@satoraspi:/var/www$
……とかやるんでしょうね。
で、まことに平和な、オッサンがやりたい計算が可能になる。
toshio@satoraspi:/var/www$ echo 'scale=20;3.3/4096' | bc
.00080566406250000000
toshio@satoraspi:/var/www$
1ティック0.81mVと思えば、まあ、間違いのないところであるようだ。
以前、Arduinoのアナログ入力にサーミスタをつなぎ、温度計にして遊んだ。最近はLCDディスプレイに温度を表示してみたり、なかなか面白い。
一方、Raspberry PiはWebによくなじむ。ApacheもPHPも走る。
 それで、先週宮城大学小島研究室のサイトで公開しておられるADCアクセスのためのソースコードを拝借して遊んだが、これを使ってWeb温度計にしてみた。
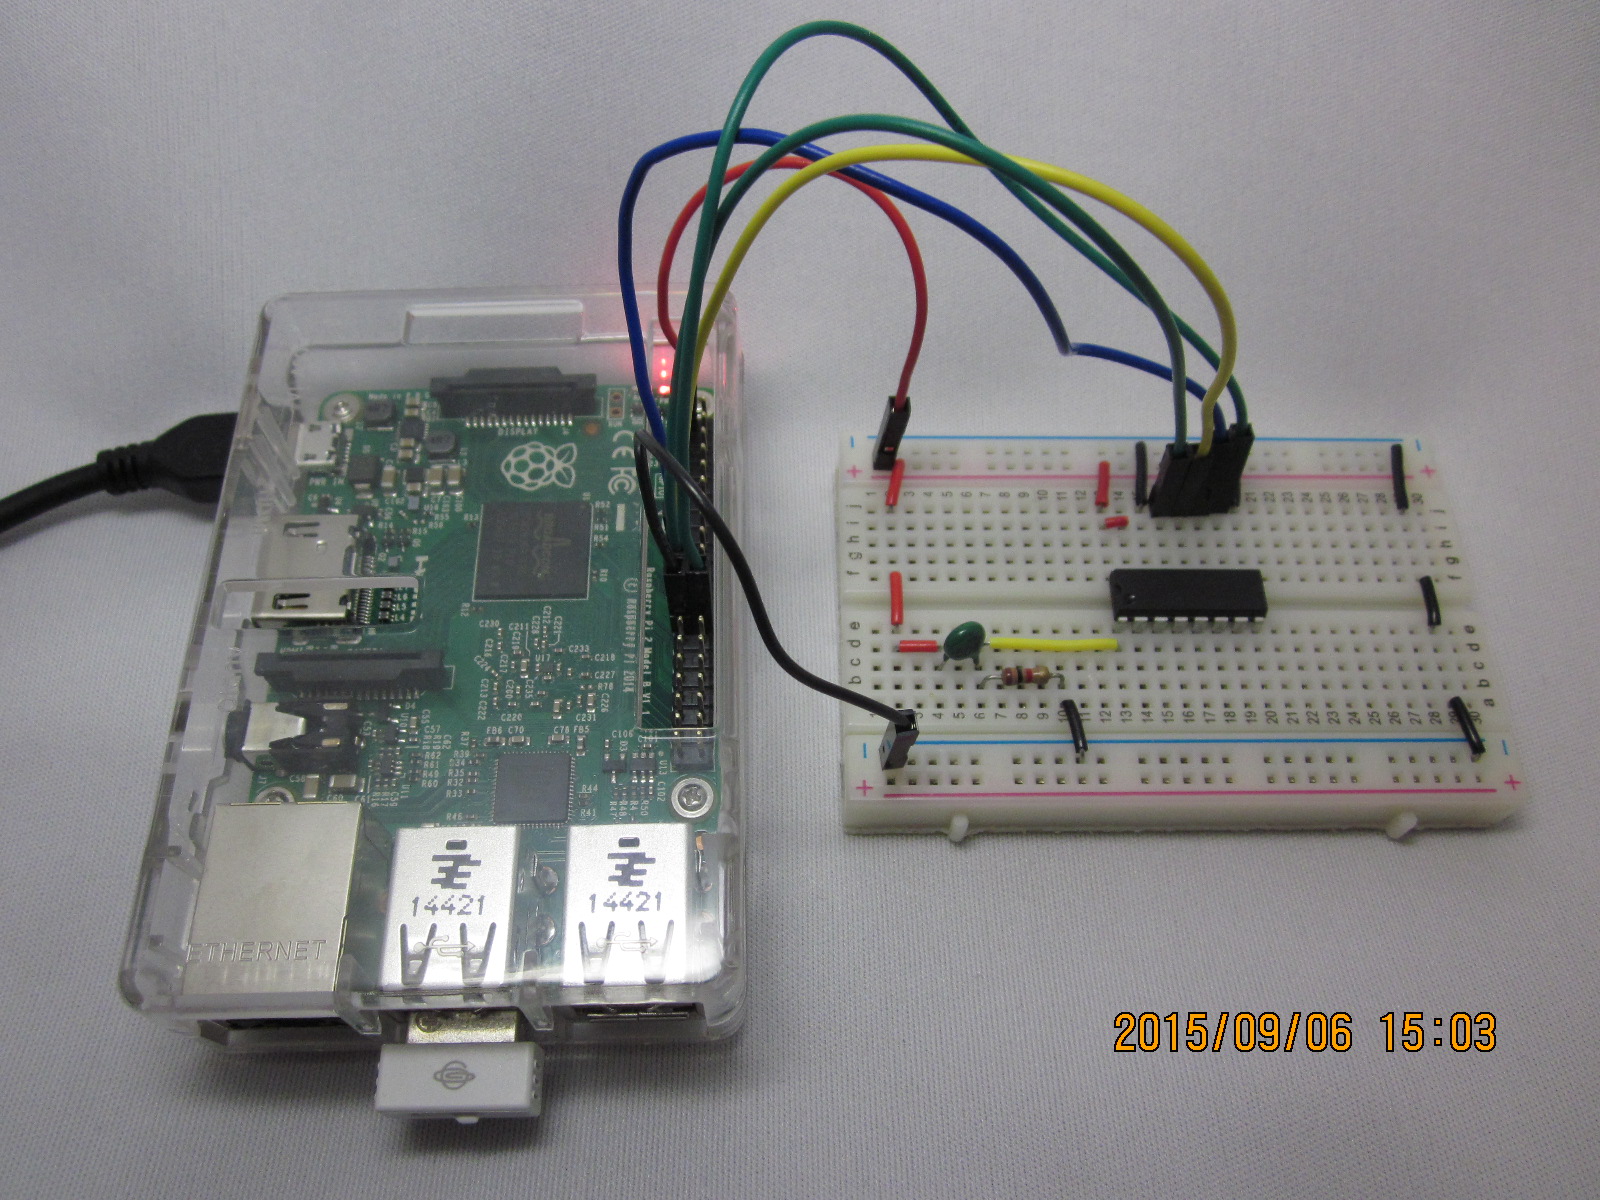
まず、ブレッドボードにAD変換ICのMCP3208と、サーミスタ、分圧用の抵抗1kΩを置き、適切に配線する。これには、以前Arduinoで遊ぶために買った「Seeedstudio Arduino Sidekick Basic Kit」に入っていたMF11-503Kというサーミスタをそのまま使う。
それから、C++でこんなプログラムを書く。先週も書いたが、宮城大学小島研究室のサイトで公開しておられるコードは、Raspberry Pi 1では何の支障もなく動くが、Raspberry Pi 2 Model Bではそのままでは動かない。一部の型キャストなどを変更する必要がある。それについては先週のエントリで記してある。
//
//    tempMesure.cpp
//      佐藤俊夫
//      Sun Sep  6 13:57:53 JST 2015
//      サーミスタMF11-503Kと1kΩ抵抗を直列につなぎ、3.3Vを印加して、
//      その間から分圧をとって温度を測る。
//      宮城大学小島研究室でウェブ公開しておられるソースコードを拝借した。
//      コンパイル
//        cc -lm tempMesure.cpp raspSPI.o raspADC.o -o tempMesure
//
#include <stdio.h>
#include <math.h>
#include "raspADC.h"

#define ADC_CHIP  ADC_3208
float tempMesure(int srcVal);

int main() {
  ADC adc;

  adc.init("/dev/spidev0.1", ADC_CHIP);
  printf("%2.2f\n", tempMesure(adc.get(0)));
}

float tempMesure(int srcVal){
  const float B = 4350.0, Ta = 25.0, Rt0 = 50000.0;  //  MF11-503Kスペックシート記載
  const float K = 273.15;  //  熱力学温度の定数
  const float v0 = 3.3, r0 = 1000.0;  //  Arduino +5Vと電流調整抵抗1kΩ
  const int resolution = 4096;  //  アナログ入力の分解能
  float vt = 0.0, rt = 0.0;

  vt = srcVal * (v0 / (resolution - 1));
  rt = (v0 * r0 - vt * r0) / vt;
  return(1.0 / (log(rt / Rt0) / B + 1.0 / (Ta + K)) - K);
}
これは単に、サーミスタで計った現在の温度を標準出力に書くだけだ。
これを「popen();」で開けば、PHPで読める。簡単である。
<html>
 <head>
  <meta name="Editor" content="vim">
  <meta http-equiv="Content-Type" content="text/html;charset=utf-8">
  <link rel="icon" href="favicon.ico" type="image/x-icon" />
  <link rel="Shortcut Icon" type="image/x-icon" href="favicon.ico" />
  <title>PHPで温度計</title>
  <meta http-equiv="Keyword" content="佐藤俊夫, 佐藤, 俊夫, SATOTOSHIO, SatoToshio, sato, toshio, Raspberry Pi, Raspberry Pi 2 Model B">
 </head>
 <body bgcolor="#888888">
<body>
  <center>
  <h1><img src="raspberry_pi.png" width="50px" align="middle"/>Raspberry Pi + PHPで温度計</h1>
  <hr>
  </center>
<?
ini_set( 'display_errors', 1 );
$process = popen("sudo /home/toshio/SPI_ADC/tempMesure", "r");
$temp = fgets($process);
?>
<center>
<table border=1 width="120px">
<tr> <th>0</th><th>10</th> <th>20</th> <th>30</th> <th>40</th> <th>50</th> <th>60</th></tr>
<tr><td colspan = 7>
<table>
<tr>
<td bgcolor="red" width="<?print $temp * 2?>px"><?print $temp?>℃</td&t;</tr></table>
</tr>
</table>
</td></tr></tr></table>
</center>
</body>
</html>
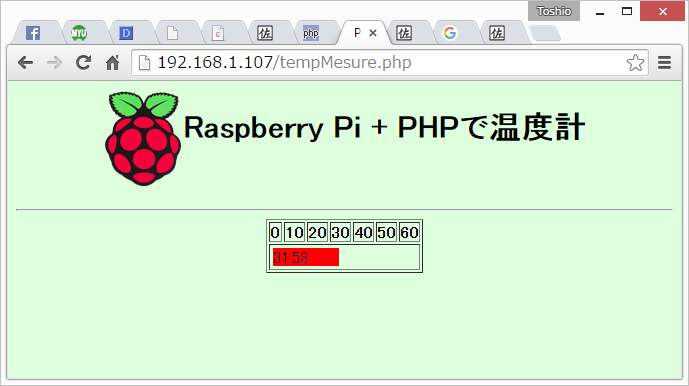
テーブルの幅を温度計のアルコール柱に見立てて、赤い帯で表すようにしてみた。
Arduinoでも同じようなことはできるが、Arduinoで難しいのは、こういうふうに、無駄に画像を配置したり、少し分量の多いHTMLを書いたりすることだ。だが、こんなことはRaspberry Piには造作もなくできてしまう。
反面、Arduinoはアナログ入力が直接可能だが、Raspberry Piで同じことをしようとすると、アナログ入力にAD変換ICを準備し、これとの通信にもいろいろと研究の上で取り組む必要がある。簡単で刺激的な目的のために少しプロトタイピングをしてみようと考えている多くのクリエイターがなしうるところではない。
入門書籍「Raspberry Piをはじめよう」にもそうしたことが少し書かれてある。
エディタはやっぱりviでないと、私ごときオッサンは調子が出ないのである。
Raspberry Piでvisudoすると、なぜか、viでもemacsでもない、nanoとかいう知らんエディタが立ち上がるので、不満なのだ。
debian系ディストリビューションでは、どうやら、「update-alternatives」というコマンドでこれを切り替えられるということを知った。
root@satoraspi:~# update-alternatives --config editor
alternative editor (/usr/bin/editor を提供) には 3 個の選択肢があります。

  選択肢    パス             優先度  状態
------------------------------------------------------------
* 0            /bin/nano           40        自動モード
  1            /bin/ed            -100       手動モード
  2            /bin/nano           40        手動モード
  3            /usr/bin/vim.tiny   10        手動モード

現在の選択 [*] を保持するには Enter、さもなければ選択肢の番号のキーを押してください: 3
update-alternatives: /usr/bin/editor (editor) を提供するために 手動モード で /usr/bin/vim.tiny を使います
root@satoraspi:~#
……とまあ、こんな感じだ。
西鋭夫が嫌いだ。
個人がどんな方なのかなど全く知らないので、知らないくせに嫌いもへったくれもないだろう、という気もするが、私が嫌いなのは個人とは遊離した「西鋭夫というコンテンツが嫌い」と言えばより正確で、人格を排撃しようなどというつもりはない。なんとなくだが、個人は多分、賢い、いい人なんだろう。
だが、嫌いなものは嫌いなのだ。嫌いな理由を論理的に説明しろなぞ、人参が嫌いな子供に嫌いな理由を問うようなもので、掘り下げたところで面白くもクソもないが、日曜日で時間があるから、嫌いな理由を無理に考えてみた。
本当の侍なら、「西鋭夫氏はCIAの招聘を義によって蹴り、相手をして『西鋭夫こそラスト・サムライだ』と言わしめた」なんてコッパズカシイことを、まるで良心的な他人が伝聞したかのような筆致で自分で書くか書かせるかなんぞ、せんだろう。そういうことはしゃべくり散らかしたりなんかせず、自分の胸にしまっておくのではないか、本物の侍だと名乗るならば。
百歩譲って依頼した広告屋がこんな案文を「西先生、紹介文はこれでよろしいでしょうか」なんて言って持ってきたら、「キミ、これはダメだよー(苦笑)」って、取り下げさせなきゃさー。
そういうことを書くことが「無知蒙昧な一般読者を獲得するための惹き文句になる」と考える粗雑さも嫌だ。
「上から目線の感度の低い爺ぃセンセイ」みたいな臭気が紛々と漂っているのが気持ち悪いのだ。
だいたい、気づいていただけるだろうか。「侍」じゃなくて、「サムライ」だぜ?
昭和の歌謡曲じゃあるまいし、カタカナで「サムライ」なんて書かれて、みなさん、恥ずかしくないか?バカにしてんだよ、結局は侍って存在や価値をさ。それに、日本の人口の圧倒的大多数は農民で、侍なんてごく一部しかいなかったんだからさ、それを最も尊重すべき日本的価値の褒め言葉みたいに言うなんざァ、ちゃんちゃらおかしくって屁も出ねェわ。
またこの腹の立つおっさんの記事が推進されてくる。あーっ、もう、腹立つなあ。
なんで腹が立つのか考えてみた。
「兵隊でも侍でもない、勉強が得意なだけのオタクのくせに、安全な金持ち学者の立場から兵隊や侍を論じる」
……というところかなあ。なにしろ、こういう爺の年代で、兵隊や侍たりえたはずがないもの。ポヨンと脂肪のついた、だらしない下腹の肉体で「お前ら兵隊はもっと鍛えろ!」みたいなこと言われたって、誰がそんなこと聞くもんかい。
Google Play Musicは文字が化ける。この対処にはいくつかの手段がある。
上記1.の方は、もう、文字化けなんか関係なく、どっぷり音楽に親しむといいと思う。文字なんか放っておいたって、音は出る。
「いやそうじゃないんだ、俺は2.だ!」という方は、「google play music 文字化け」などで検索すると、とてもたくさんの情報が出てくるので、その情報に従い、音楽データの文字情報をUTF-8あるいは16にコンバートすると良い。私も前から「id3uni」だの「mp3tag」だの、他人様の作品をありがたく使わせていただいている。
そんなわけで、酔っ払う。最近ウィスキーも安いからね。
だいぶ前にWikipediaに書いた項目が、7、8年ばかりも放置するうち雑草だらけになっているのをさっさと掃除する。